First and foremost, we have to thank our past customer for recommending his friend to our shop to get this done. This may be a small thing to some, but to us it is a big sign of confidence shown to us by our customer and we really appreciate it. On with the install…
The owner of this car wanted a basic head unit that he can use Apple CarPlay. He also wanted something that looks good and also sounds good without much installation hassle. He didn’t have any need for watching YouTube, Netflix nor a larger screen, in which case we would have pointed him towards the Android OS direction.
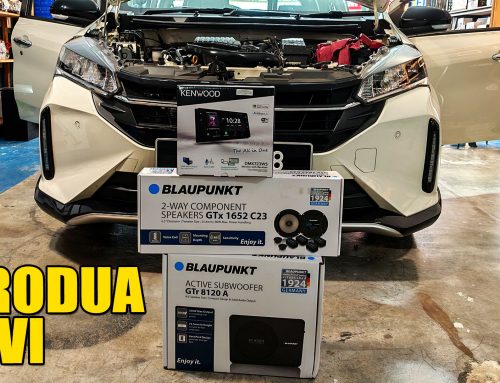
Thankfully Kenwood makes a handful of models that fits perfectly into cars that use the Toyota 200MM DIN size. Models such as the DDX919WS, DDX820WS and the DMX820WS all come with the Toyota harness so installation is pretty straight forward. Of course there may be instances where you will need additional adapters for the radio antenna, steering wheel controls, OEM reverse camera and such. But the basic main harness can just plug in without needing any wiring. If you are looking for these size head units, do checkout our website here https://www.fasmoto.com/audio-video/head-unit/head-unit-200mm. Don’t hesitate to drop us a message should you need assistance.
Head unit installation for the Toyota Hilux is very easy, probably one of the easiest cars out there. Heck, give your toddler some tools and put them to work. Removal of the surrounding trim is just a matter for popping it out as it is held with plastic clips. A plastic pry tool comes in handy for this. The factory radio is held with 4 screws. The original bracket that holds the unit will need to be transferred to the new Kenwood unit. The holes all match so no fuss there. For this particular Toyota Hilux model, all plugs match too, so no need for any additional wiring and harness adapters to the head unit.
As for the reverse camera, a little more work is needed. Let your toddler rest for this one. Firstly , the tailgate needs to be drilled to fit the Blaupunkt RC TY 1.0 camera. This camera is perfect for this install as it can be mounted in pretty much any orientation which gives you the flexibility in mounting locations.
The cable for the camera is then run through the tailgate along the bottom of the vehicle and up under the passenger seat where there is a rubber boot which it can pass through. From there we run it along the kick panel up and to the back of the head unit to make the connection. Voila, now you can make sure you don’t run over your dog or cat when backing up, which is always a good thing.
If you are looking to tackle this similar install, we would say go for it. Just make sure you have a drill and some simple tools and you should be good to go. If you don’t want to do this yourself, just get in touch with us and we will give you an estimate.
Featured Products:
Kenwood DMX820WS – https://www.fasmoto.com/kenwood-dmx820ws
Blaupunkt RC TY 1.0 – https://www.fasmoto.com/blaupunkt-rc-ty-1